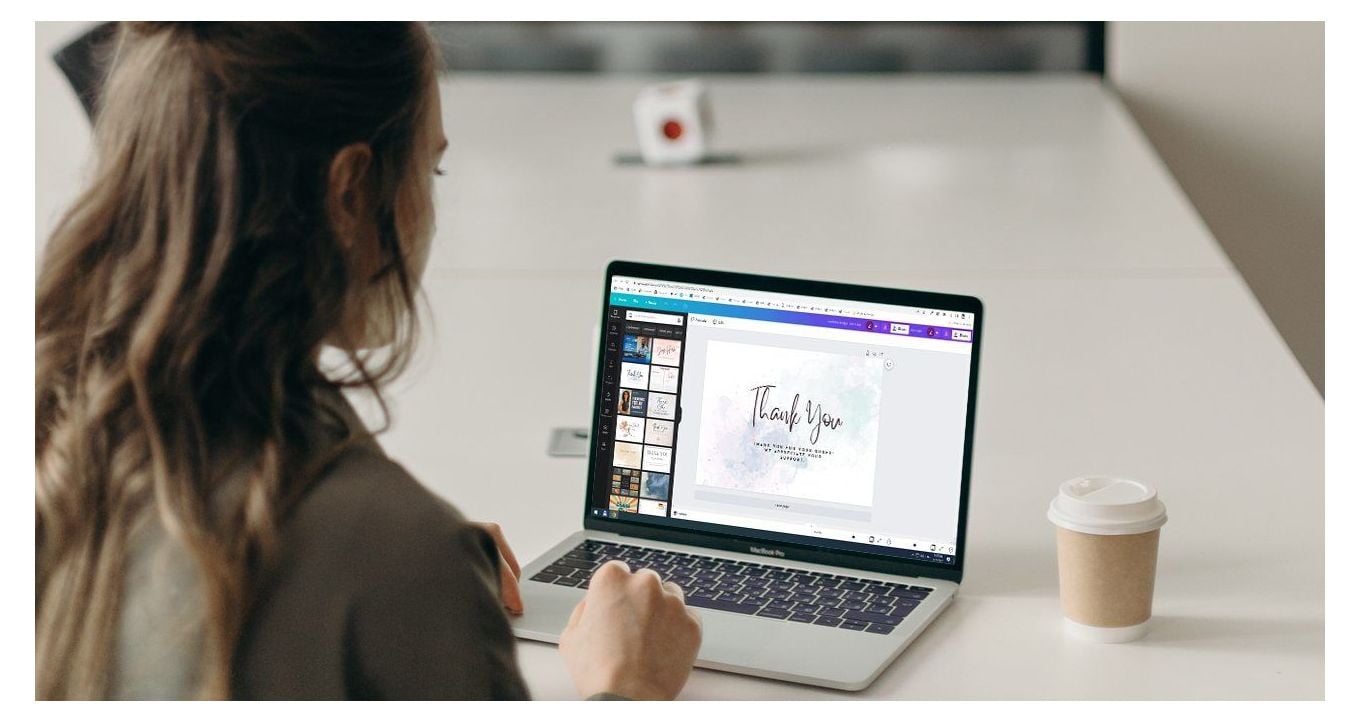
Read this article to learn how to set up a print file in your Adobe software, so you never have any issues with your printer again.
Adobe InDesign, Illustrator, and to some extent, Photoshop have been the go-to design tools for print designers for many years. And that’s no surprise, considering their capabilities and PDF export options designed specifically for the print industry. However, even if you are the best designer in the world, if you don’t set up your print file correctly, chances are your printer will not like you very much.
Incorrectly set up print files can create many problems. They cause production delays, the colors printed on paper may be different from what you intended, photos can turn out blurry and pixelated, the size of the printed product may be wrong… Which all leads to reprints, more delays, and more expenses.

To avoid all these problems, you need to pay attention to three segments in your design process:
- File creation
- Layout, colors, and image resolution
- Exporting print-ready file
Before we dive into these segments, here are a few notes:
Some print shops run specific workflows, requiring designers to export their PDFs a certain way. If this is the case, this information should be easy to find on their website, or they will give you these instructions once you contact them. But the rules and principles we are about to mention remain true no matter what the case is.
How to create a new file
Before we even create a blank canvas, we need to know what we want to print. Ask yourself these three questions:
• What product am I designing?
• What should be its printed size?
• Is it a one-sided or two-sided print?
• Bonus question if you are designing a multi-page document: How many pages should be in the document, and what is the binding method?
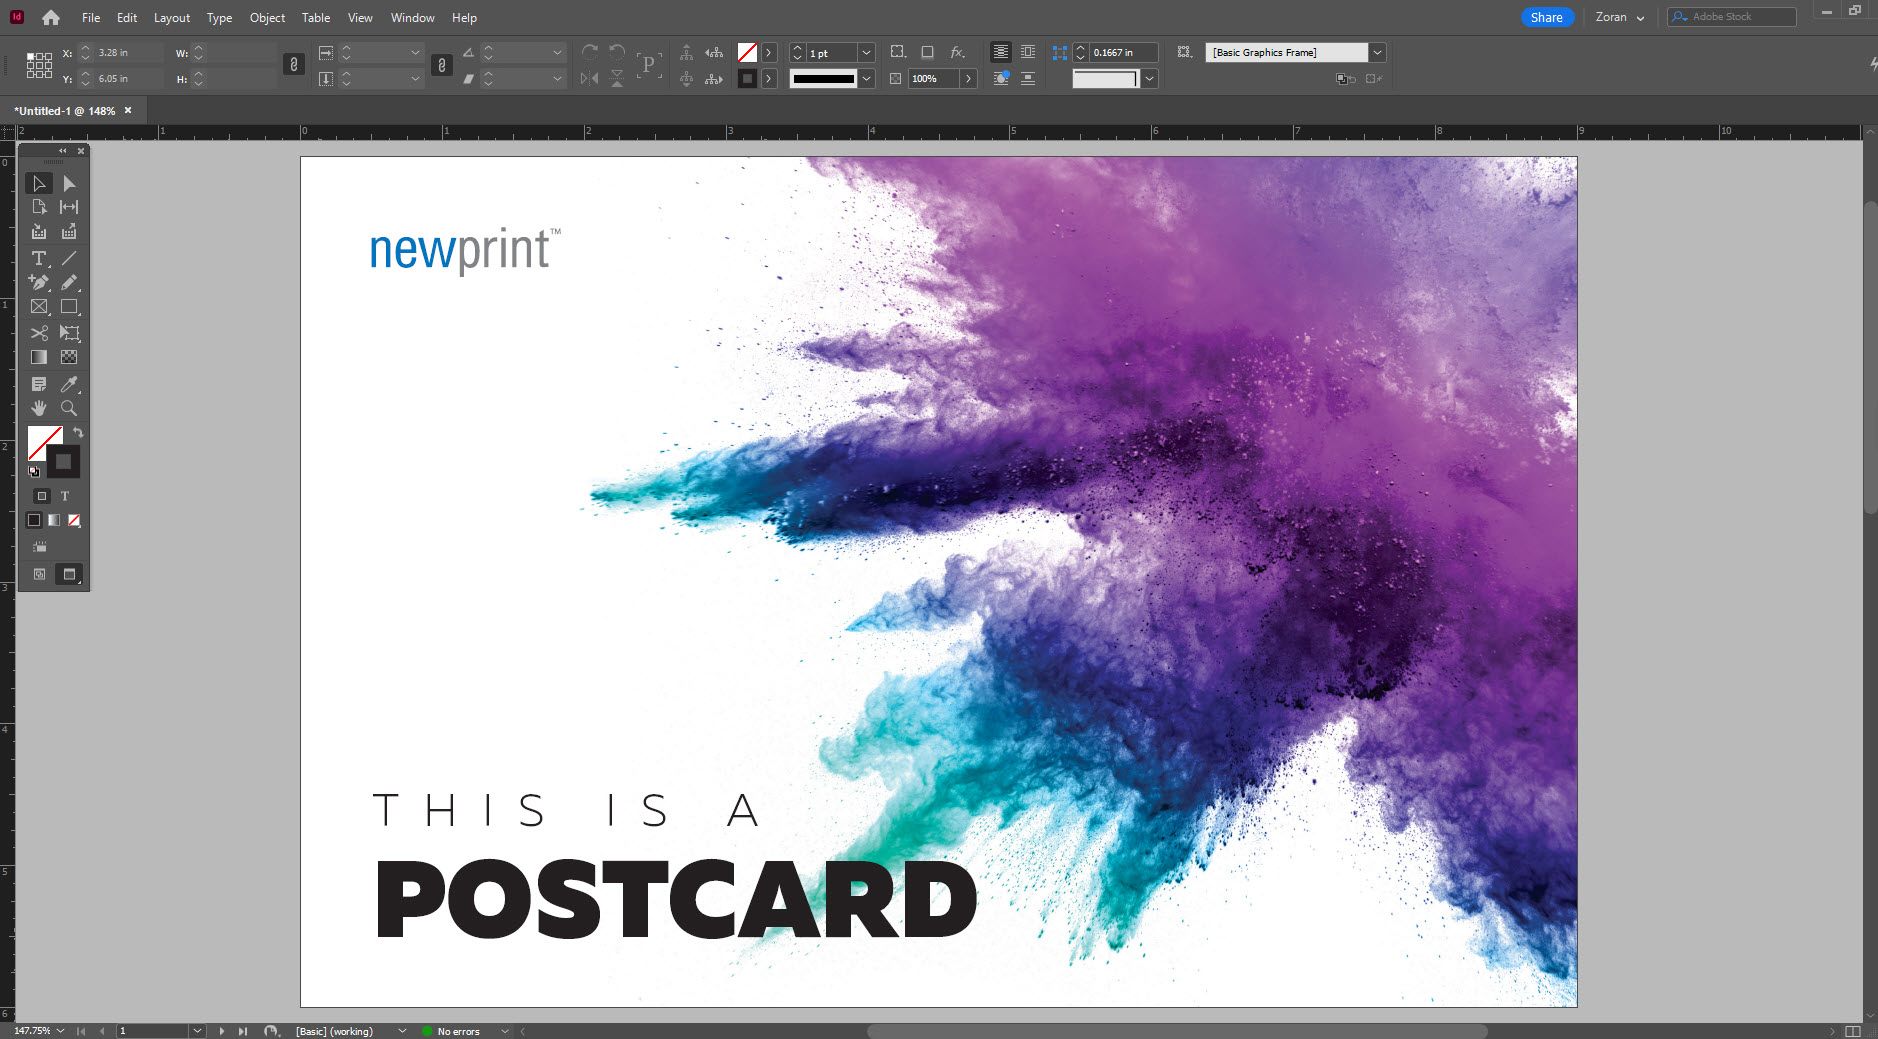
The answers to these questions will affect your file setup. So, let’s give ourselves a goal. Let’s say we want to design a postcard, that size should be 9 x 6 inches, and it will print on both sides. Now let’s see how to properly set up a new file for this product using Adobe InDesign, Illustrator, and Photoshop.
Create a new print file in Adobe InDesign
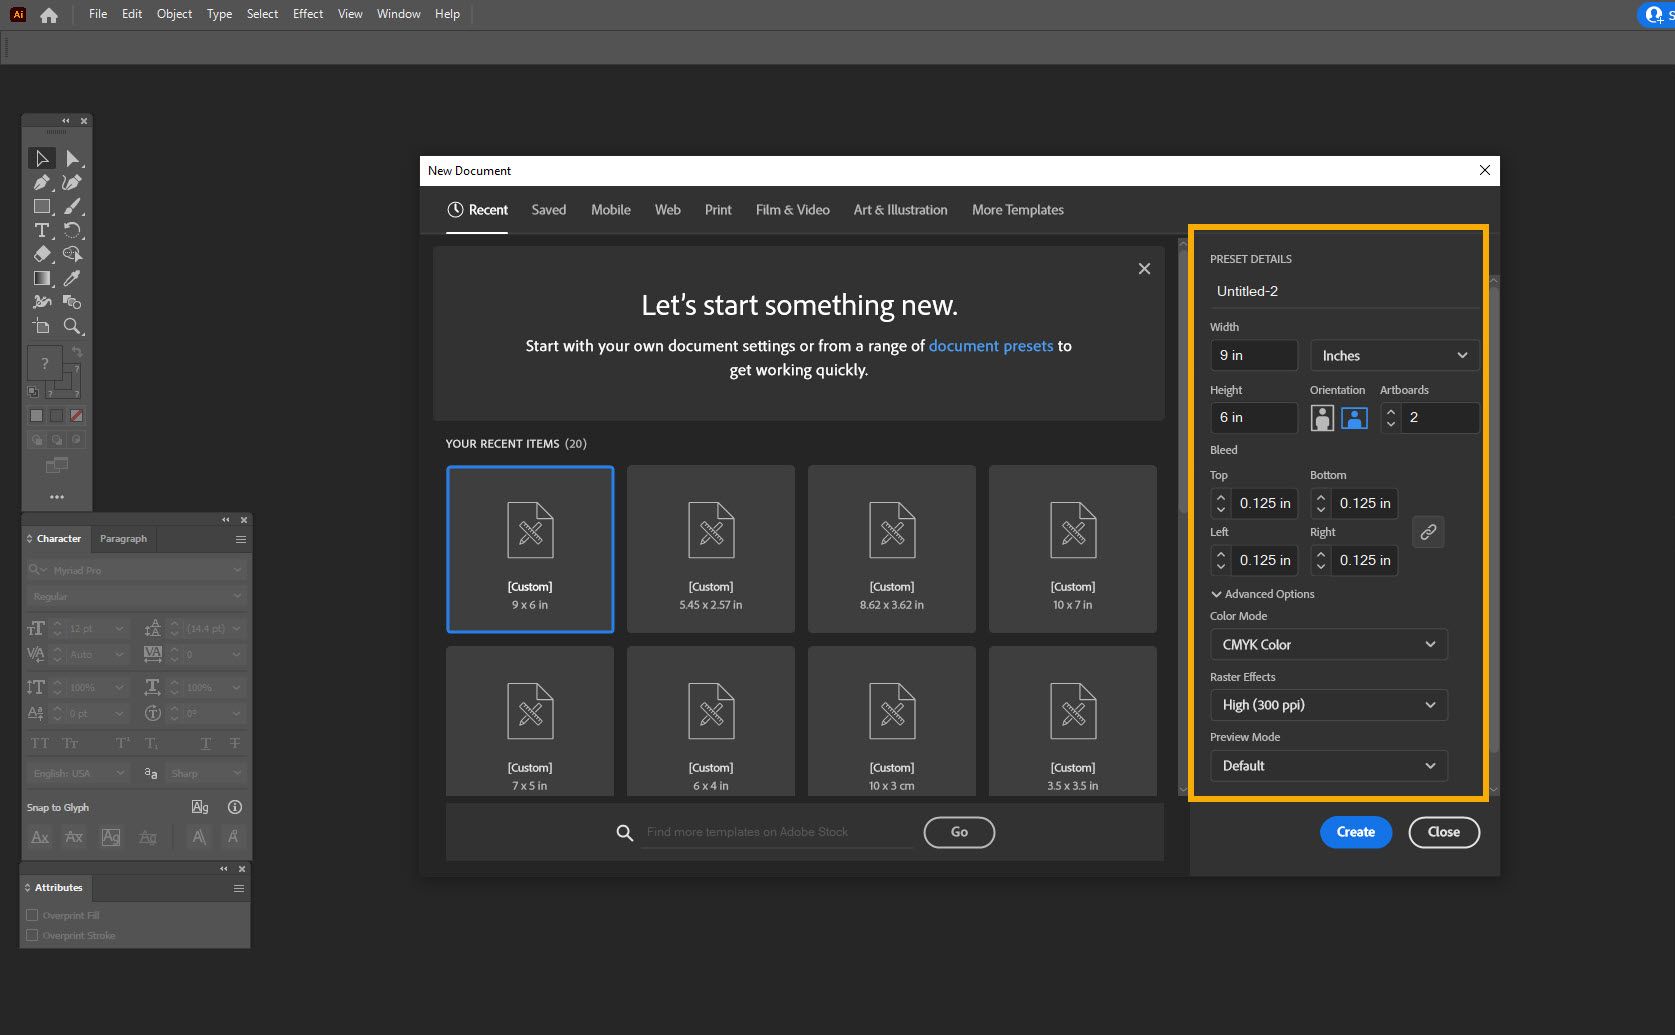
Let’s take a look at the ‘New Document’ dialog box in Adobe InDesign. As already mentioned, we must set up our print file according to how we want it printed. Our print product’s final size must match our design document’s size.
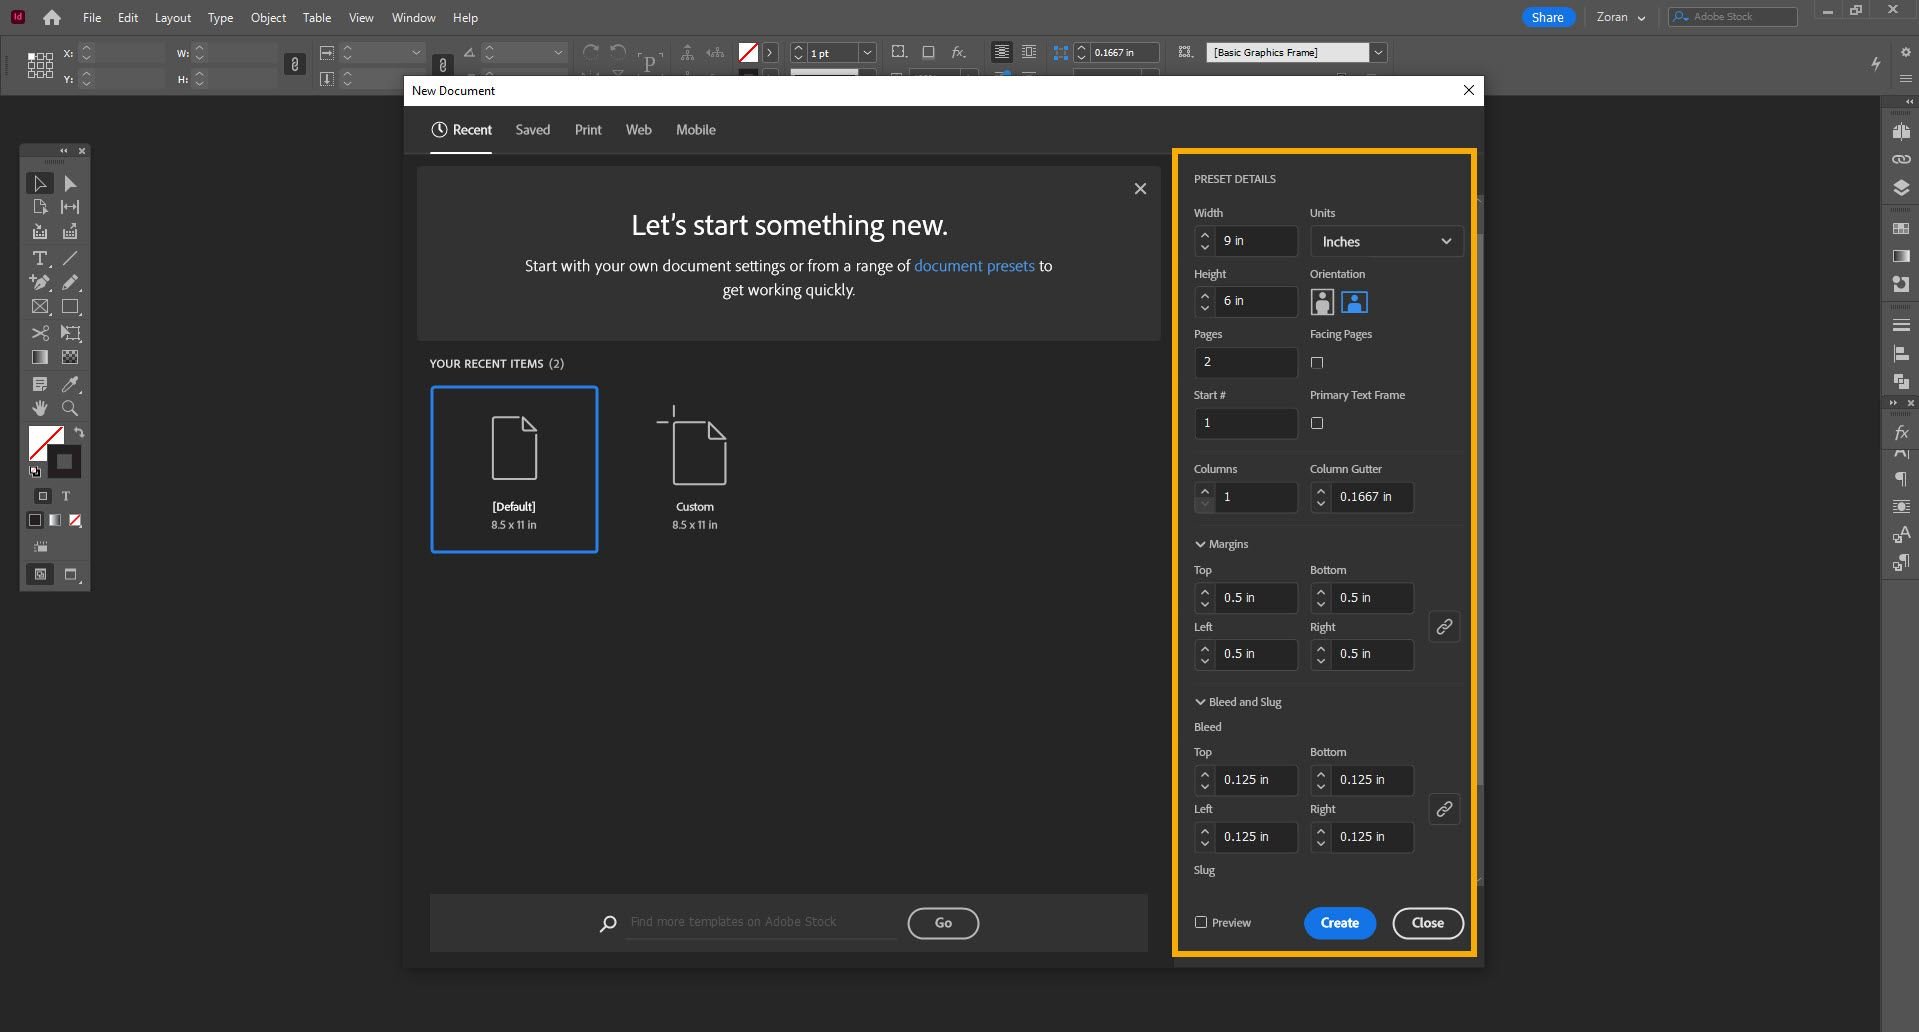
The first thing is the page size. The numbers you type in these fields must match the trim size of your printed product. We said we want our postcard to be printed at 9 x 6 inches, so we will enter 9 for width and 6 for height. Just make sure that ‘Units’ is set to inches or any other measurement required for the document you are creating.
The following field is ‘Pages’. For our postcard example, we will enter ‘2’; as we said the postcard would be printed on both sides. So page 1 would be the front side of our postcard, and page 2 would be the back side. The ‘Facing Pages’ checkbox should be unchecked in this case. This option will create your file as a spread, placing two pages next to each other. This is very useful for creating multi-page designs such as books or catalogs. But in this case, we don’t need it.
The ‘Columns’ field will not affect printing. It will simply create guideline columns to help you lay out your design.
‘Margins’ in Adobe InDesign correspond to a safe zone. In printing and design terms, a safe zone is an area in your design where you should put all your important design elements, such as text, logos, and photos. In most cases, margins should be set at least 0.125 inches away from the edges on all four sides. Some print products will require different margins. For example, if you are designing a book, you must consider binding. A book design with a margin of 0.125 inches would result in text going deep into the binding, making the book impossible to read.
In our example, I will set the margins to 0.5 inches. It is not because postcards require that big of a margin but because it is more visually appealing to have your text a bit further away from the edges.
And finally, we get to bleed settings. Almost every print product requires bleed. It is an area that extends out of the trim size of your document, and it is there to prevent white edges on your printed product in case there is any shifting of paper sheets during the cutting process. The most common bleed settings are 0.125 inches on all 4 sides. But different printers may have different bleed size preferences. It is always a good idea to check this with your printer before you start creating your files.
Now, let’s see what the document we created looks like.
Create a new print file in Adobe Illustrator
The ‘New Document’ dialog in Adobe Illustrator is similar to the one in InDesign, but with some slight differences.
First, make sure your units are correct. Most commonly, you would choose inches, millimeters, or centimeters, depending on the standard in your country. Once the units are set, type in the trim size of your document. For our example, it will be 9 in x 6 in.
The following field to set up is ‘Artboards’. Artboards are basically pages, so we would choose 2 artboards for our postcard example—one for the front side and one for the back.
Everything we said about bleed in the previous section goes here as well. Set the bleed to 0.125 inches on all four sides or whatever value you got from your printer. If you are working with millimeters, bleed settings are usually between 3 mm and 5 mm.
Finally, in the ‘Advanced’ section, set the color mode to ‘CMYK’ and the resolution to ‘High (300 ppi)’.
Now let’s see what the document we created looks like.
Notice that in Adobe Illustrator, there is no ‘Margins’ option. However, we can create them ourselves by dragging guides. We do this so we have our safe zone set up.
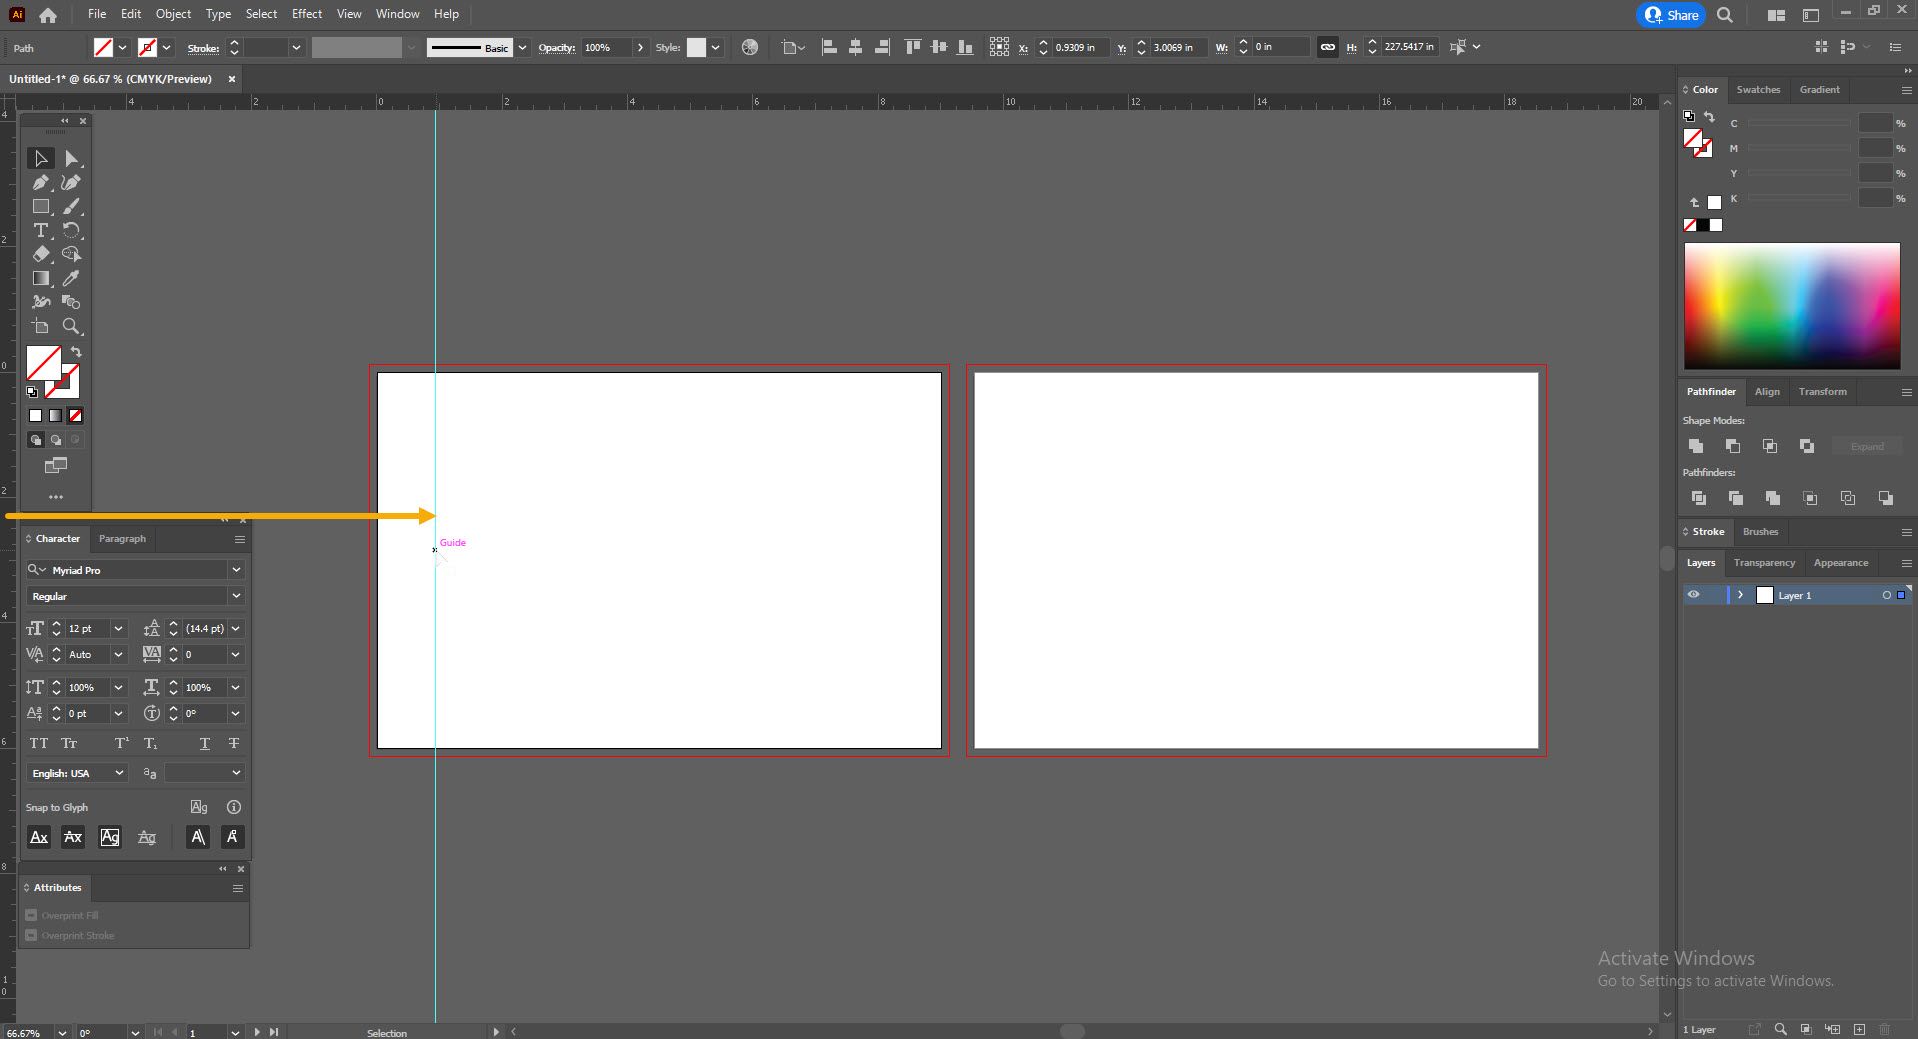
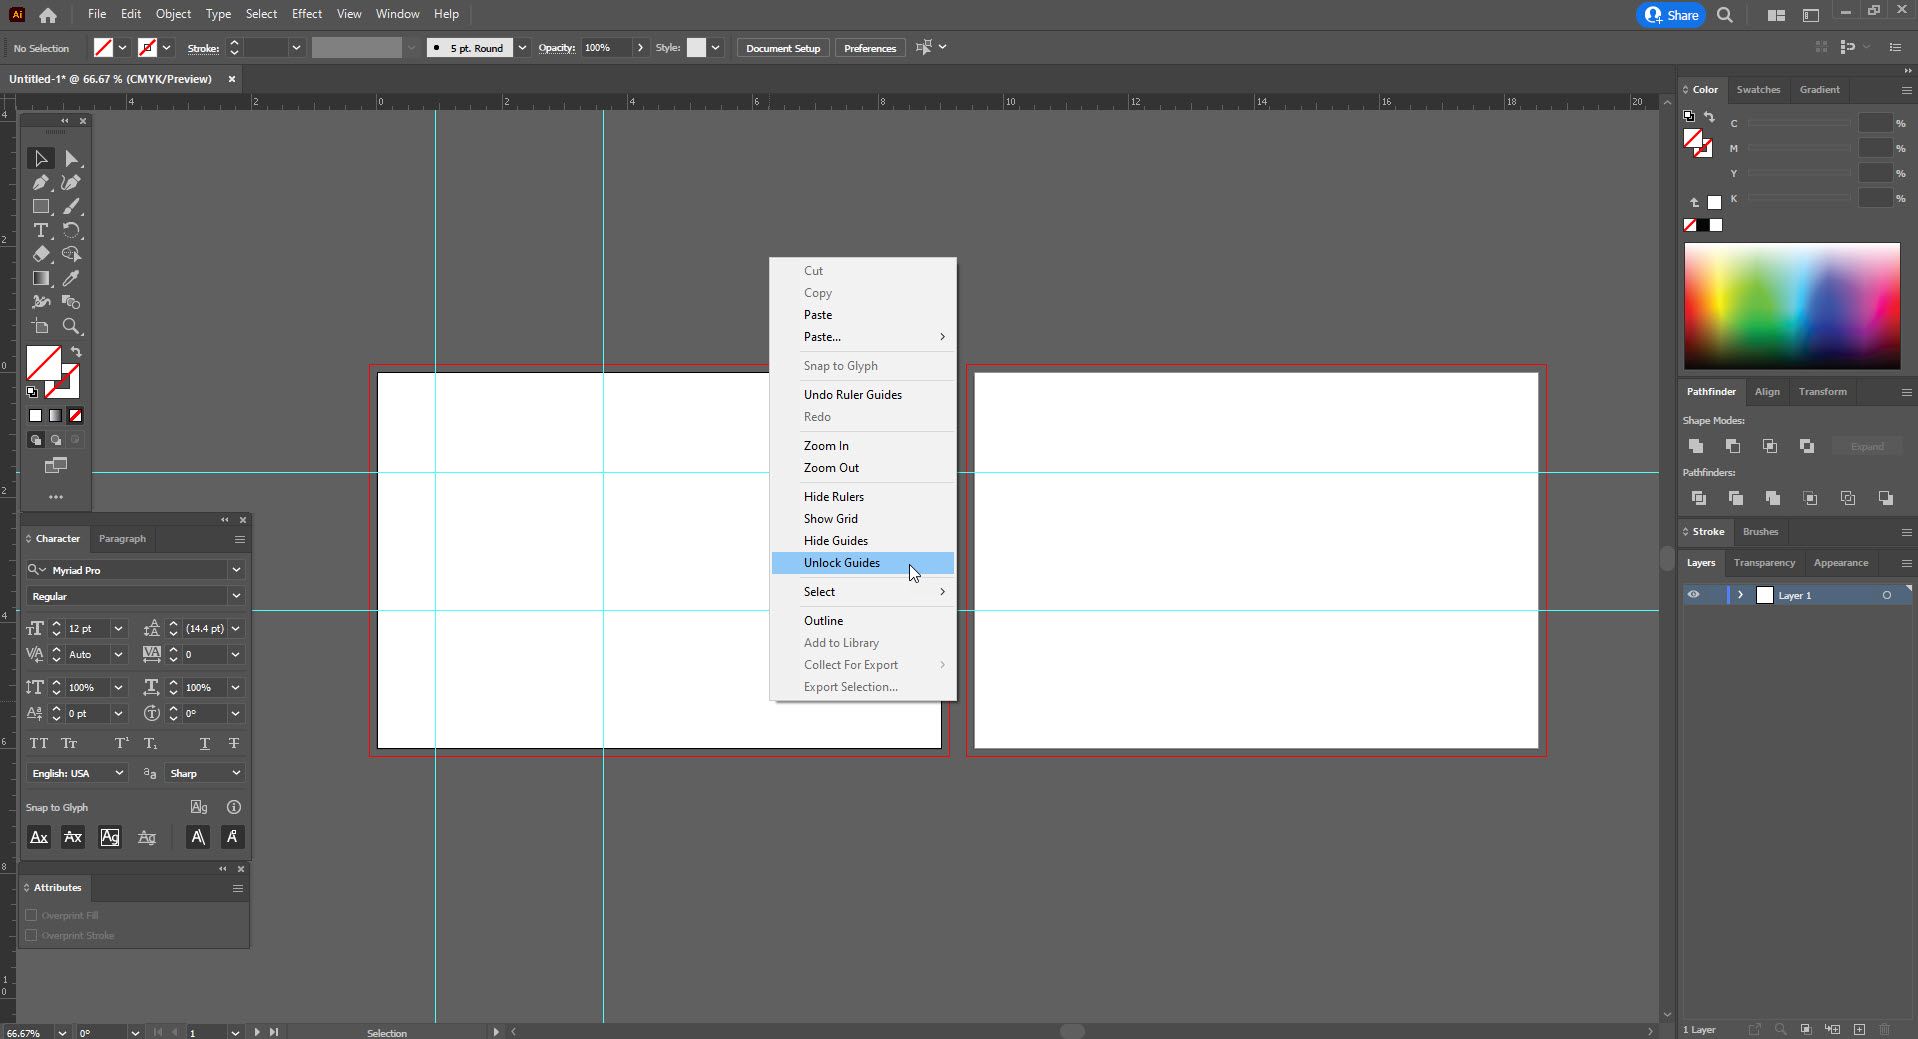
Click and hold anywhere on the ruler and drag the guides onto the artboard.

Create two horizontal and two vertical guidelines. Then right-click anywhere and select ‘Unlock Guides’.
Now we can move the guides using the X and Y axis to position the guides perfectly. Use the X-axis to move vertical lines and the Y-axis to move the horizontal lines. By default, the start of this coordinate system is in the top left corner of the artboard. So, we can now select the first vertical guide and type in 0.5 in the X field. Select the second vertical guide and type in 8.5 in the X field. We will type in 0.5 in the Y field for the first horizontal guide, and for the second, we will put 5.5 in the Y field.
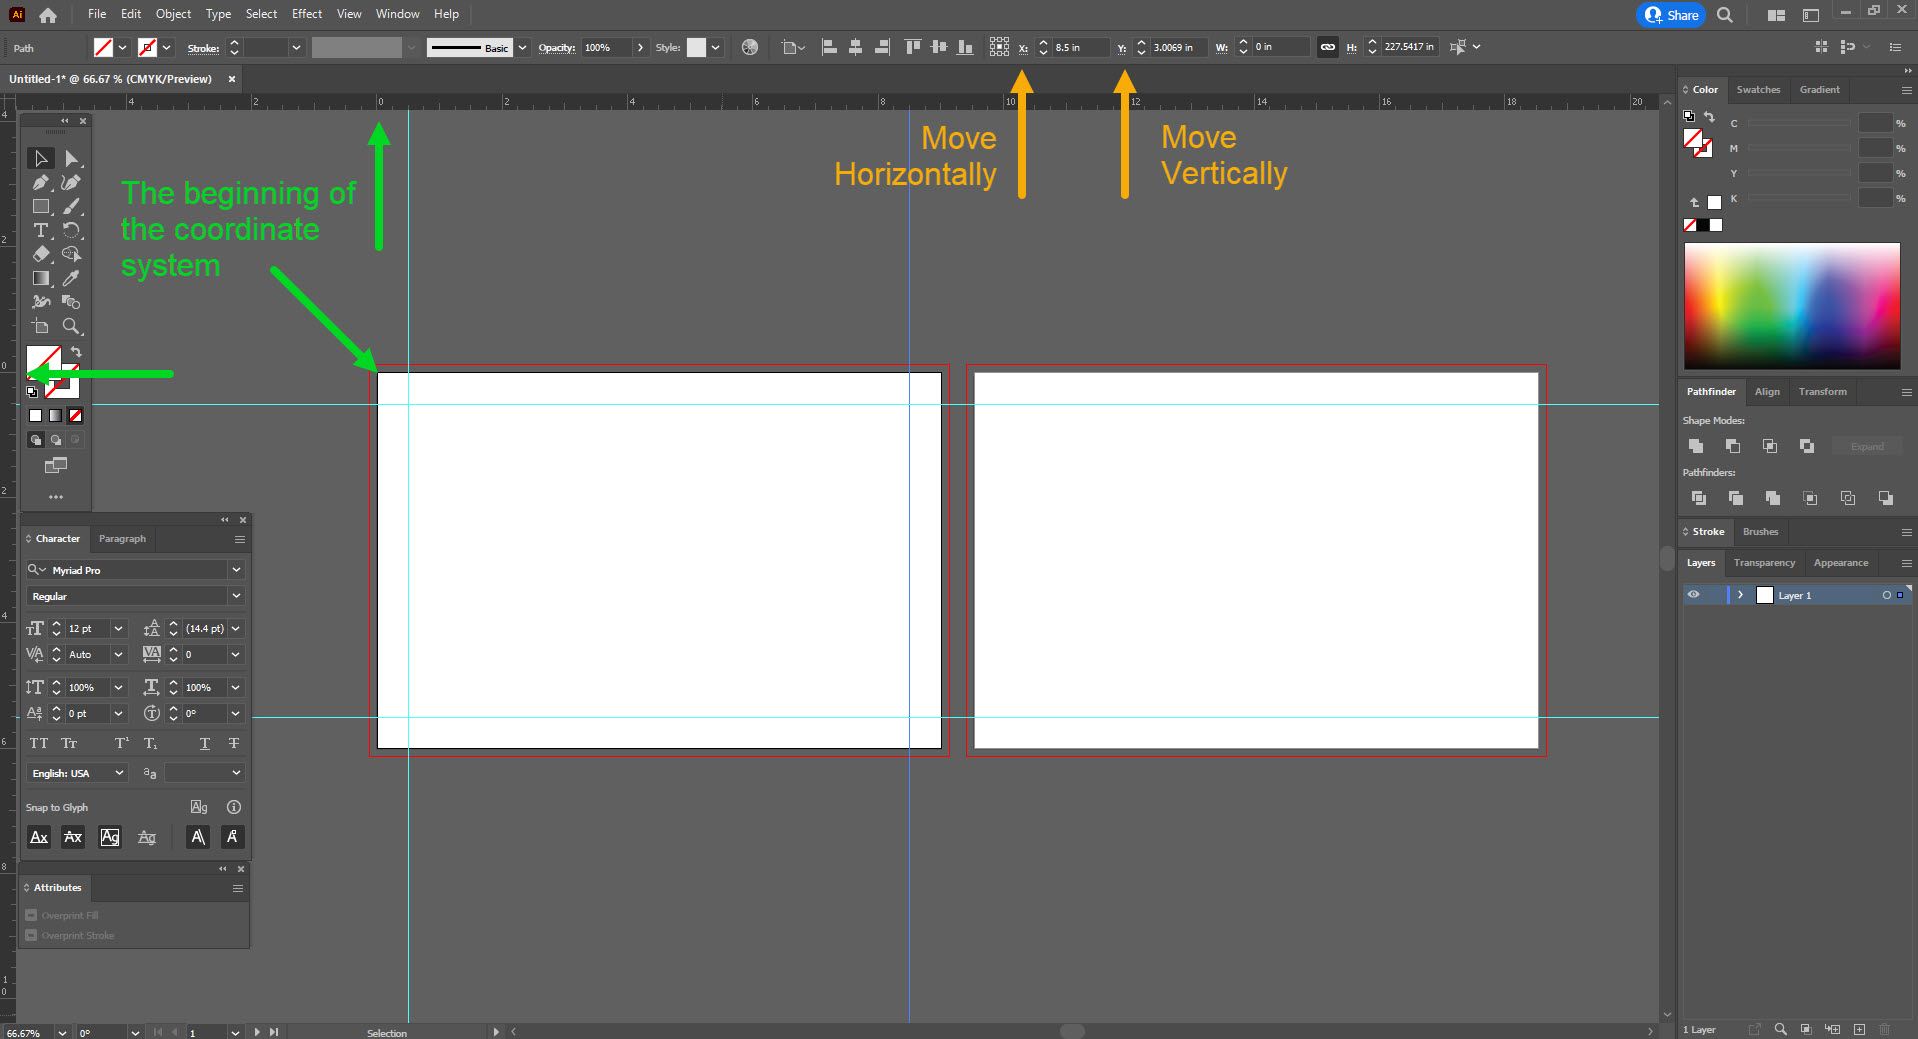
This way, we created a safe zone with guides that are 0.5 inches away from the edges. Repeat this process for the missing guides on the second artboard. Just keep in mind that you first need to click anywhere inside the second artboard to make it active.
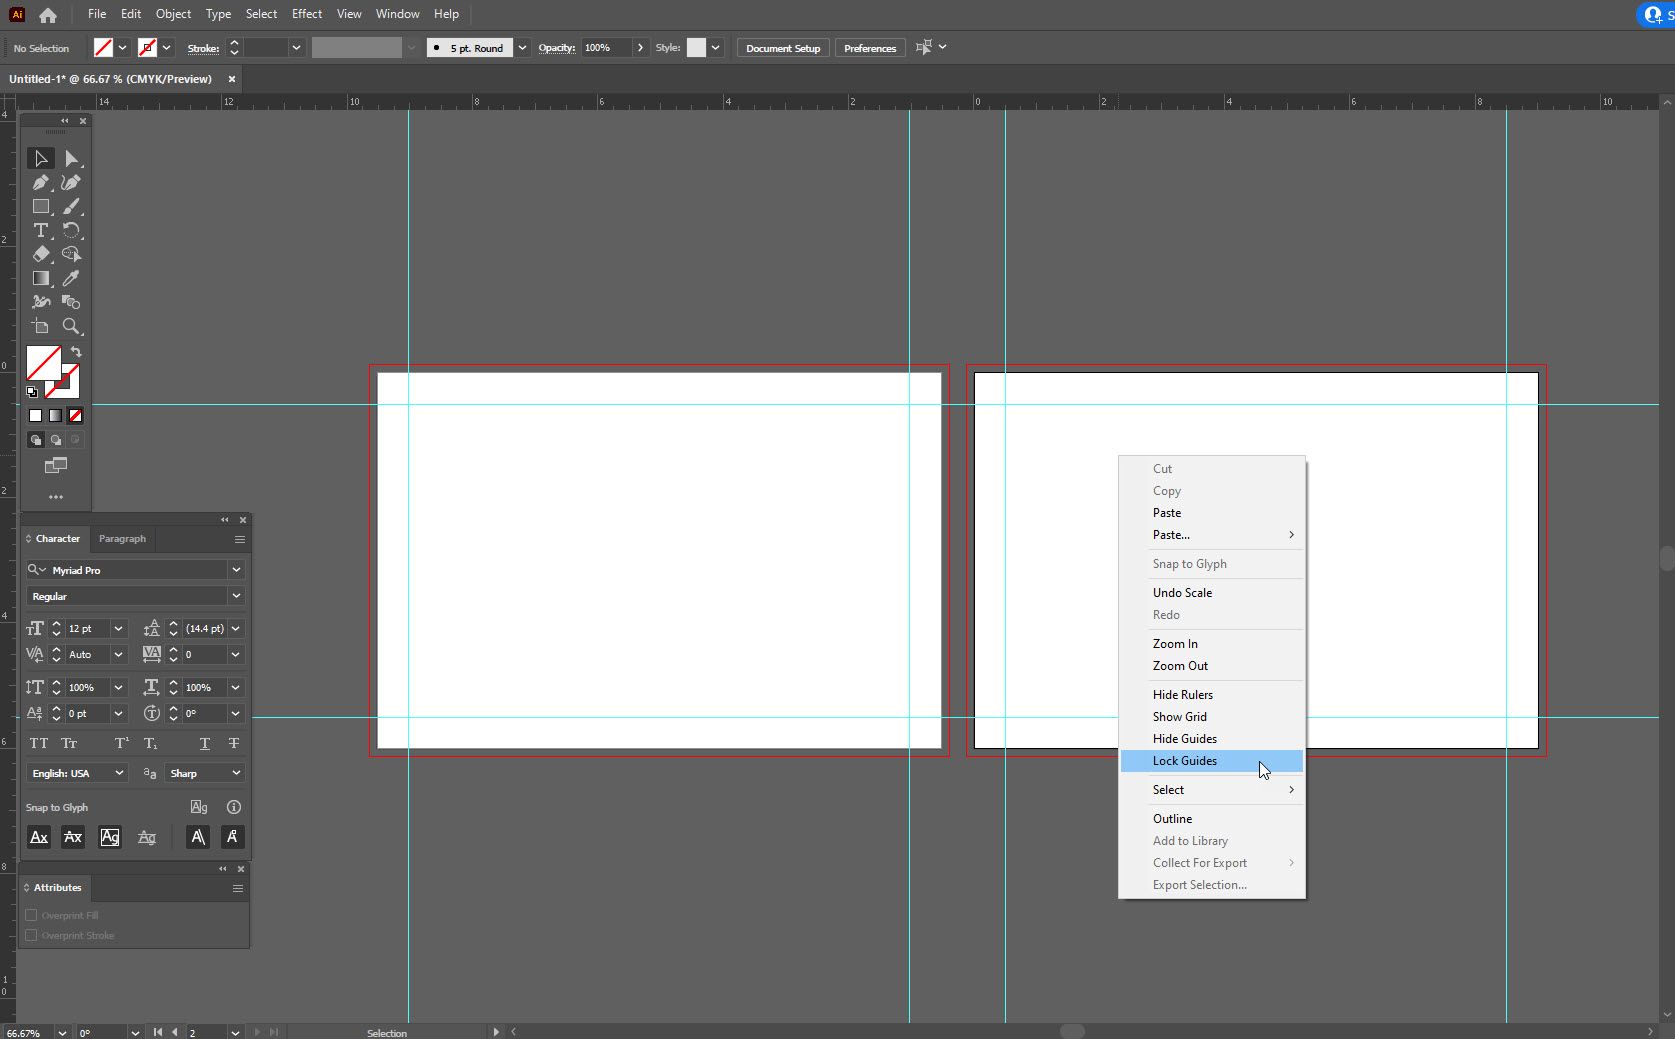
Once the guides are set, you can right-click and select ‘Lock Guides’.
Create a new print file in Adobe Photoshop
Before starting, we have to point out that Photoshop should not be your go-to software for print design. Thanks to its extensive capabilities, you can create a design from start to finish in Photoshop. However, it is primarily a photo editing tool, and we recommend you only prepare your photos in Photoshop and use InDesign or Illustrator to create your print-ready file.
But if Photoshop is your only option, here is what you should do.

As always, we will first set the measurements to inches. Because Photoshop is not intended for print, there are no bleed settings in this dialog box. So we need to add bleed to our overall document size. As already mentioned, the bleed area in most cases is 0.125 inches on all four sides. That means our document size should be 9.25 in x 6.25 in. The resolution should be set to 300 pixels per inch, and the color mode should be CMYK.
The one thing left to do is add safe zone margins. We will do this the same way as in Illustrator, by dragging guide lines. Drag a guide line, right-click while it’s selected, and click ‘Edit Selected Guide’.
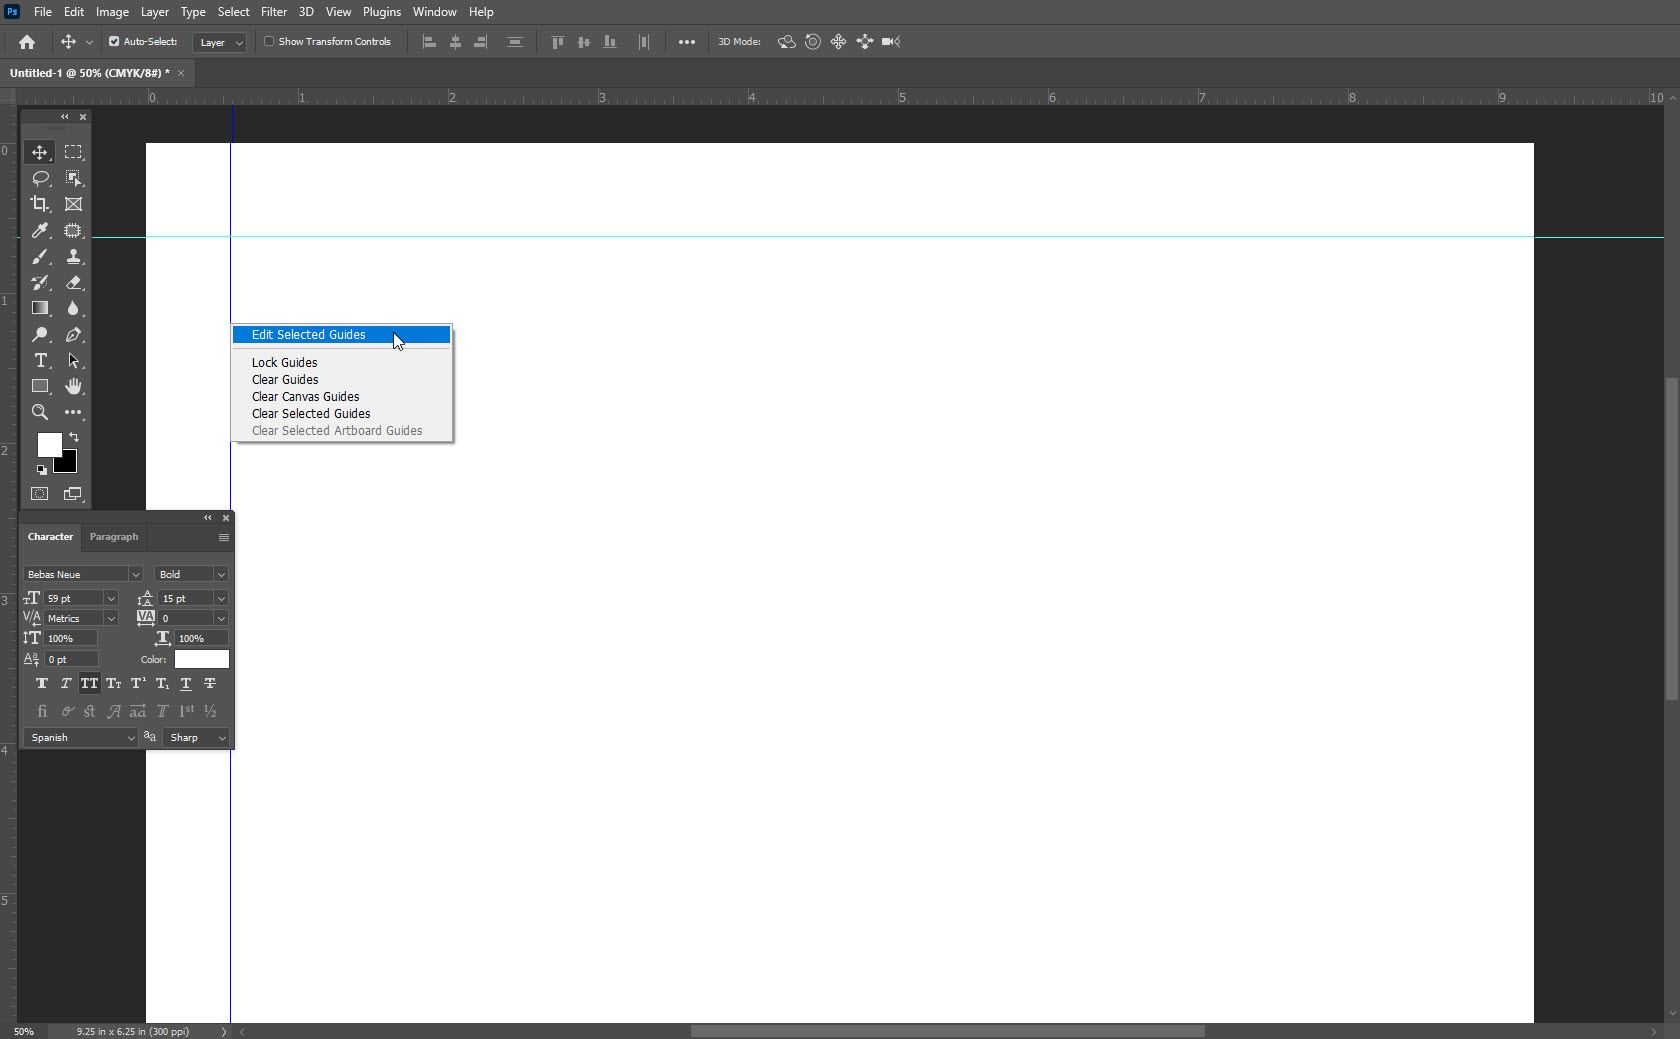
Here you must remember that bleed is part of the document size in Photoshop. If we want to set the margins to 0.5 inches, we would have to move the guides 0.625 inches away from the edges because 0.125 inches is bleed, and this area will be trimmed in the print process.
Layout, colors, and image resolution
Now that we have the print file set up, let’s add some basic design and discuss the layout rules. We will do this demonstration in Adobe InDesign, but all the rules apply to any other design tool.
To keep things simple, our design will consist of a logo, some text, and a background image.
Let’s now change the display mode and take a look “under the hood”.
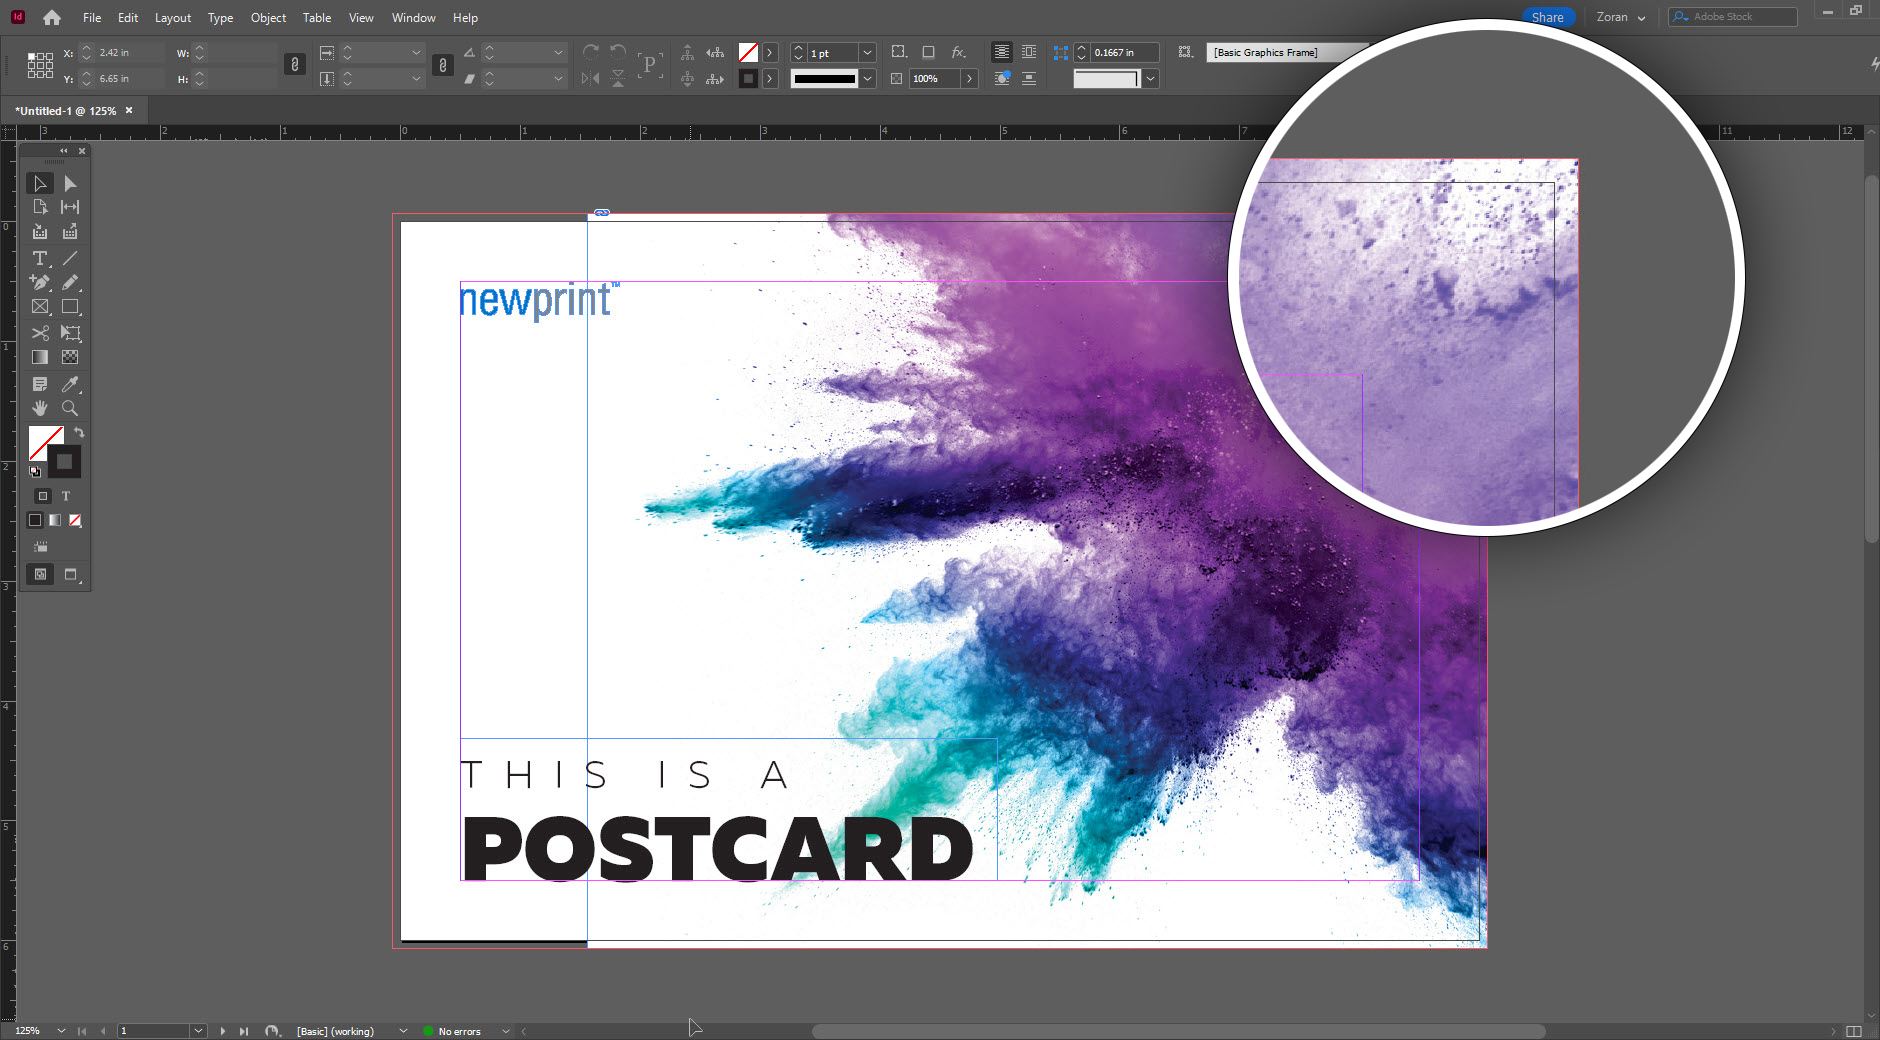
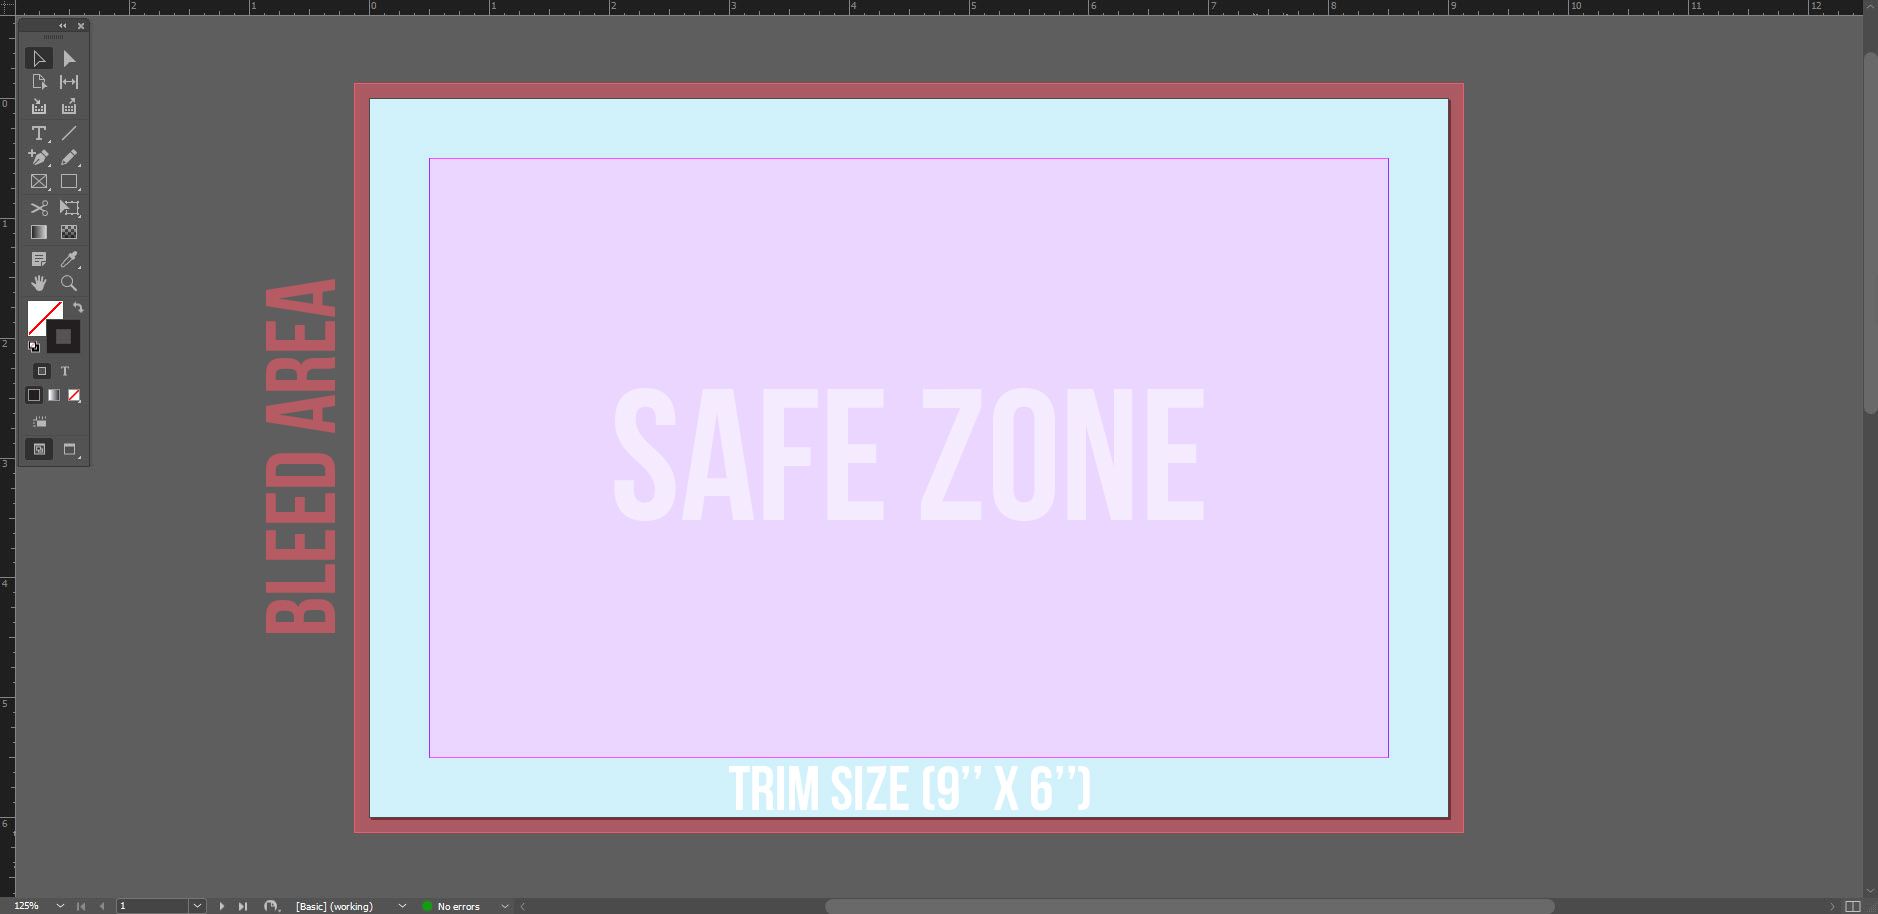
Safe Zone
As already mentioned, the important design elements must stay within the safe zone. In this example, the logo and text are positioned right at the margin. The minimum safe zone is 0.125 inches away from the edges for most print products. This applies to all the cut lines, but to the fold lines as well. A postcard is a simple rectangular product that only requires trimming on four sides. However, products such as boxes will have much more cut lines and fold lines. A safe zone must be applied to every cut and fold line.
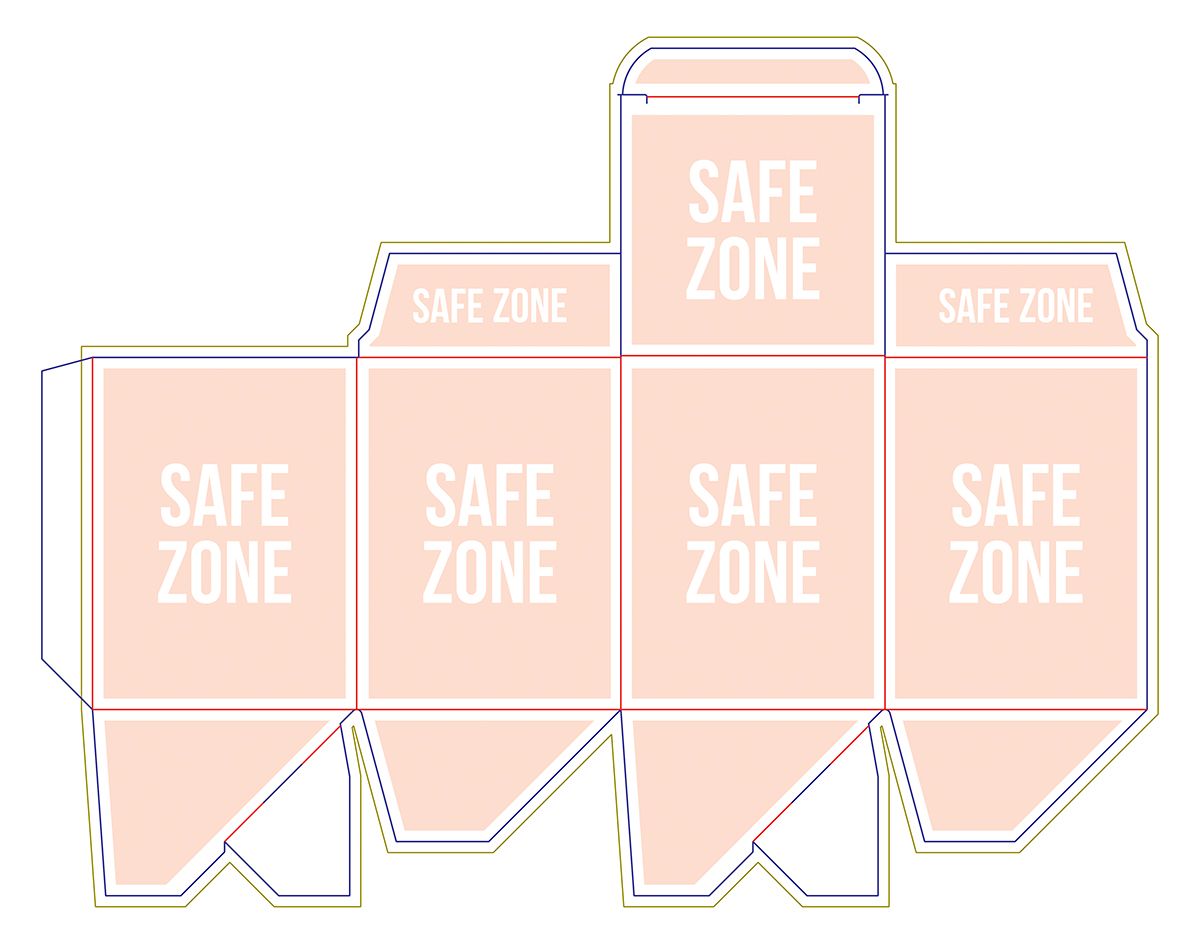
Bleed
The background elements that are supposed to go to the edges of your document must expand to cover the bleed area as well. In our example, the background image goes all the way to the edges, so it must be extended to the bleed area as well.
Colors
Everything you design for print must be in CMYK color mode. If you have photos as part of your design, they must first be converted to CMYK and then placed on your artboard.
Black text is also something to pay attention to. In most cases, you want your black text values to be 100% K, especially the small text. CMYK stands for the four primary printing colors - Cyan, Magenta, Yellow, and Black. The value of 100%K means the black color will only be printed in one process color - black. Adding cyan, magenta, or yellow values to your black text may cause smudged and blurry text. Bigger text can use rich black, which is usually C 40 M 30 Y 20 K 100.
Avoid RGB black by any means. When an RGB file gets converted to CMYK, the black color can have values like C 74 M 67 Y 66 K 90. This is simply too much ink for a sheet of paper to receive. This amount of ink takes much longer to dry, so the printed image becomes smudgy, and the paper sheet becomes damp and starts to curl. To avoid this problem, always check the black color values when you convert from RGB to CMYK. And if the black has values that include all four process colors, change the values to K 100.
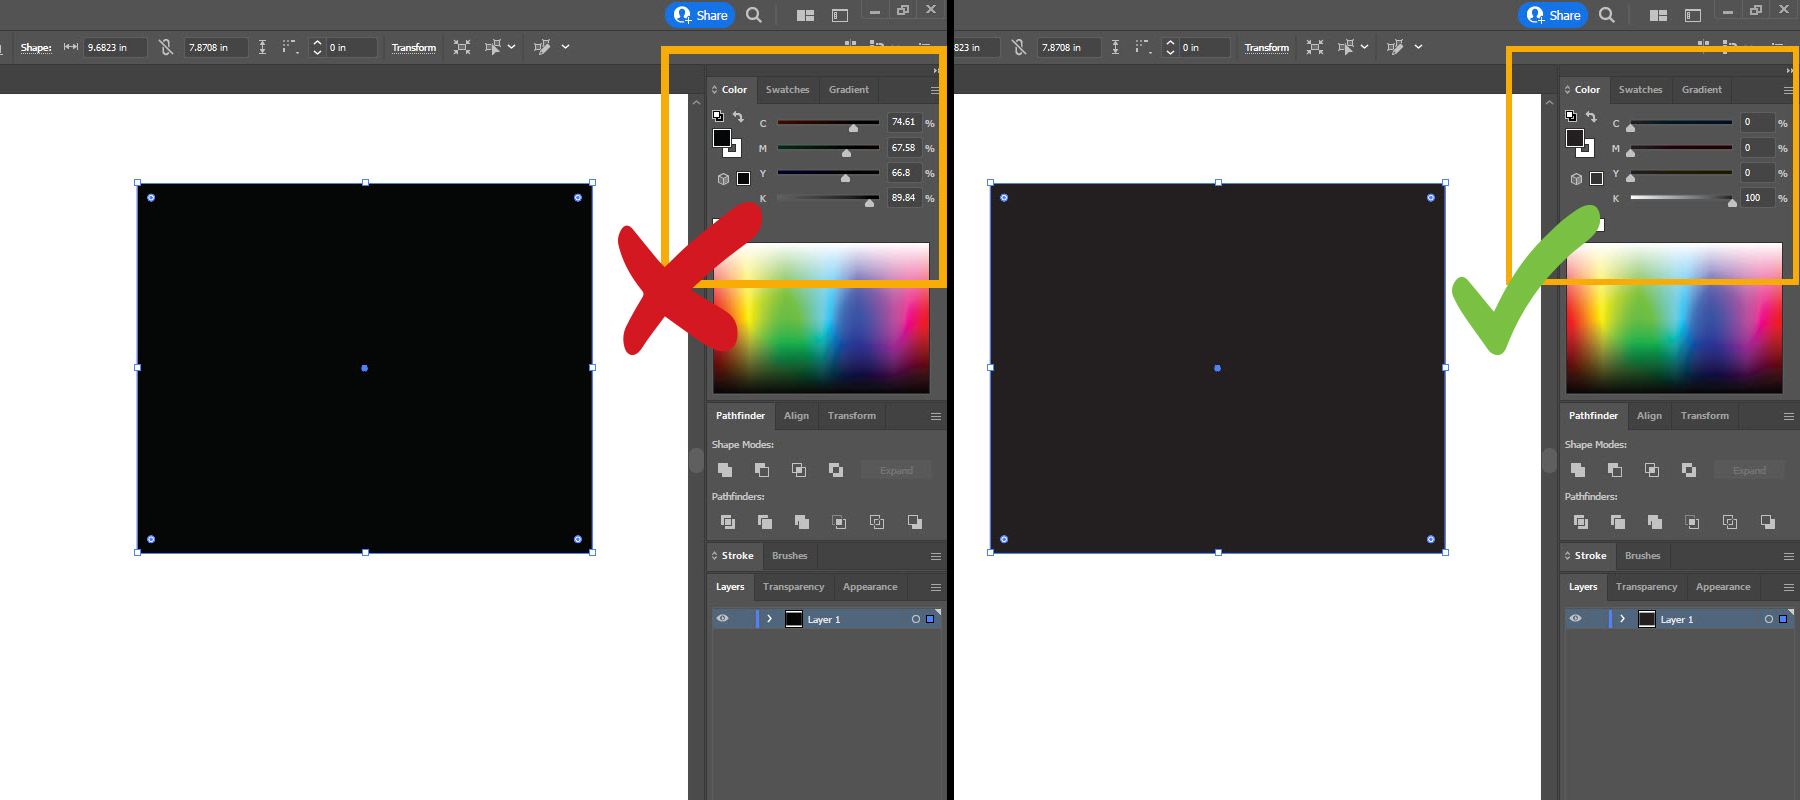
Image resolution
All the images you use for print design must be set to 300 ppi resolution. Once you place the images on your artboard, they will appear at their full, maximum size. You can scale down the images, but you shouldn’t scale them up because that leads to blurry and pixelated images.
Export print-ready file
Once your design is done, all that’s left to do is to export the print file. As mentioned earlier, some print shops may have a specific workflow that requires you to export the PDF according to their specifications. But if this is not the case, the following PDF export settings will do just fine.
Export the print file in Adobe InDesign
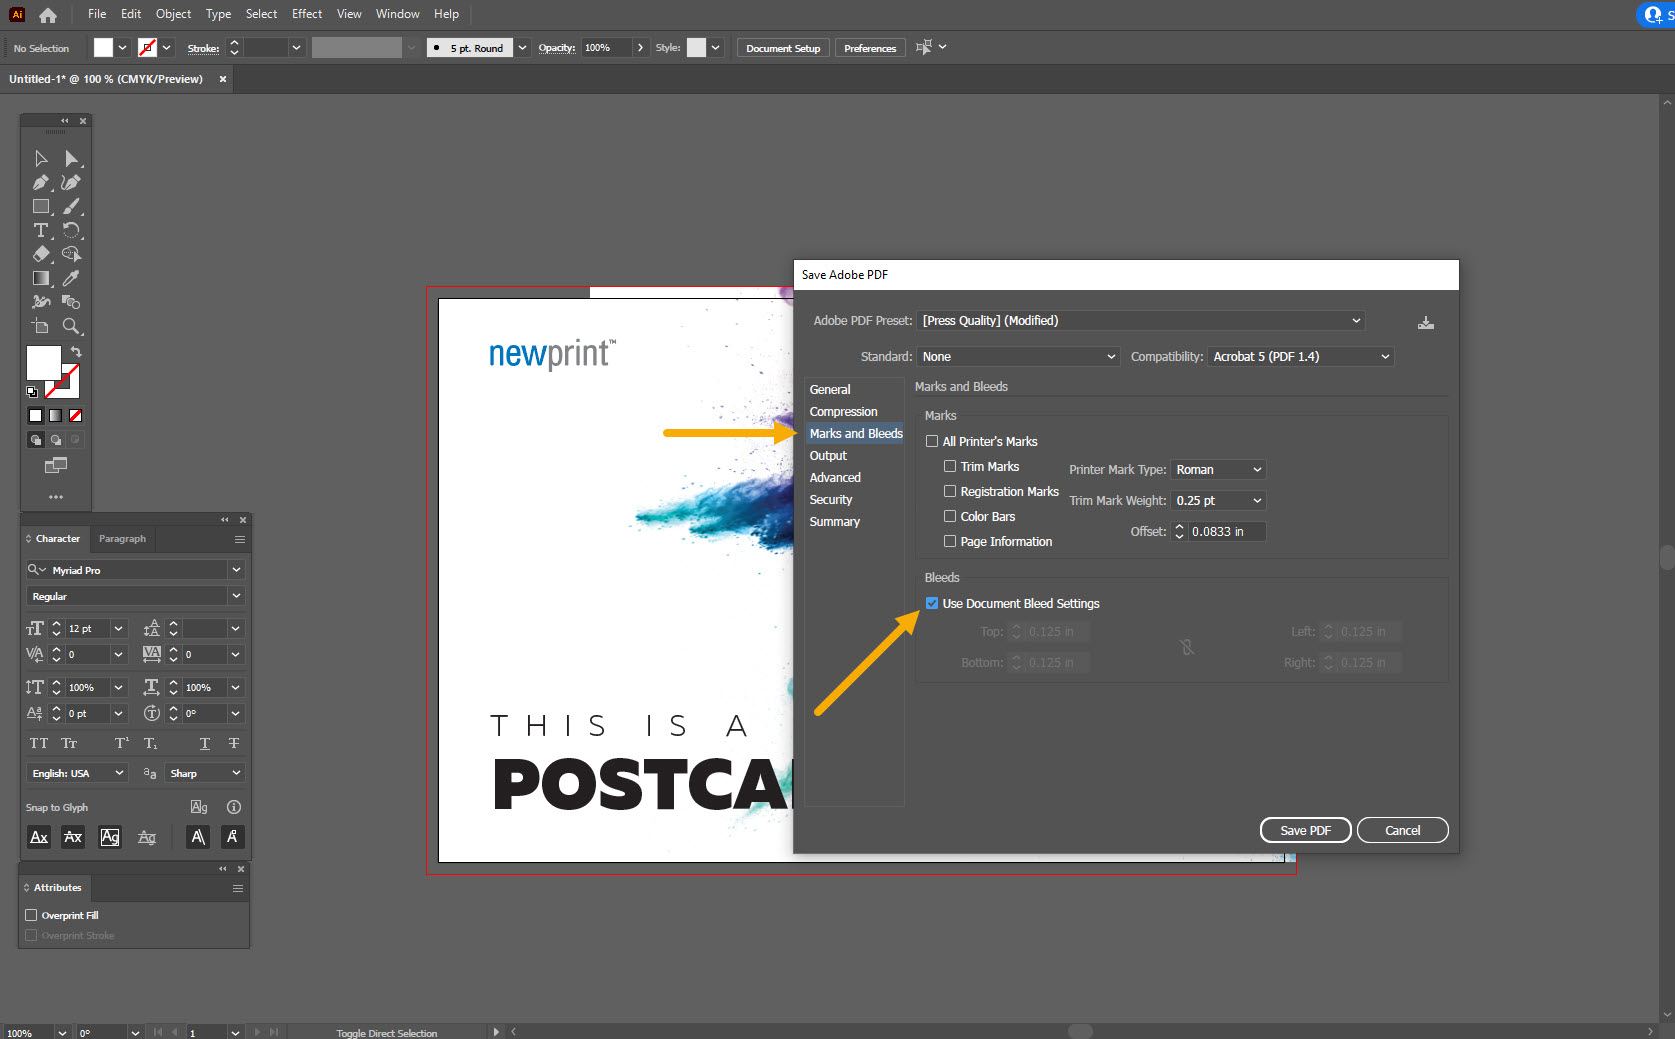
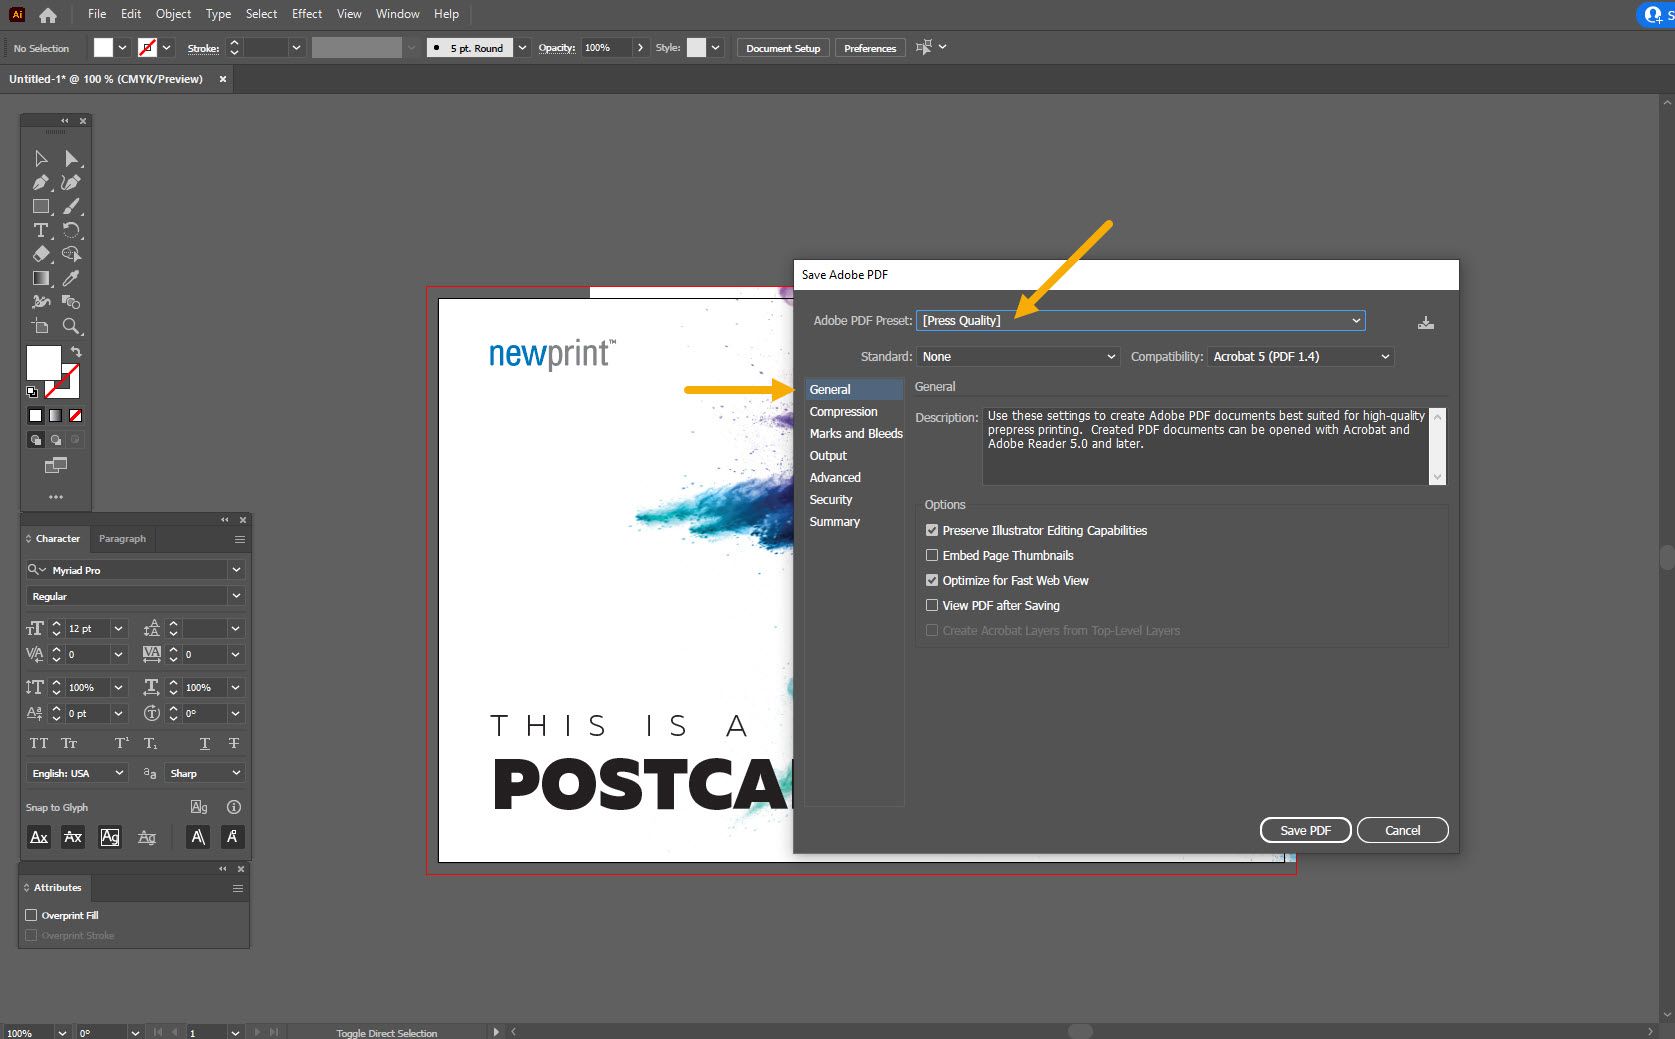
Go to File / Export and choose Adobe PDF (Print) as a file type. In the next dialog box, choose the Press Quality preset and make sure the Export As is set to Pages. With these options selected, the PDF will export at the highest quality, and it will export every page individually within one PDF file.

Next, go to the Marks and Bleeds tab and only check Use Document Bleed Settings. This will take the bleed settings that were already set when creating your document and apply them to the exported PDF.
Click Export.
Export the print file in Adobe Illustrator
Go to File / Save As and choose Adobe PDF as a file type. Click Save.
Next, choose the Press Quality preset.
On the Marks and Bleeds tab only choose Use Document Bleed Settings and click Save PDF.

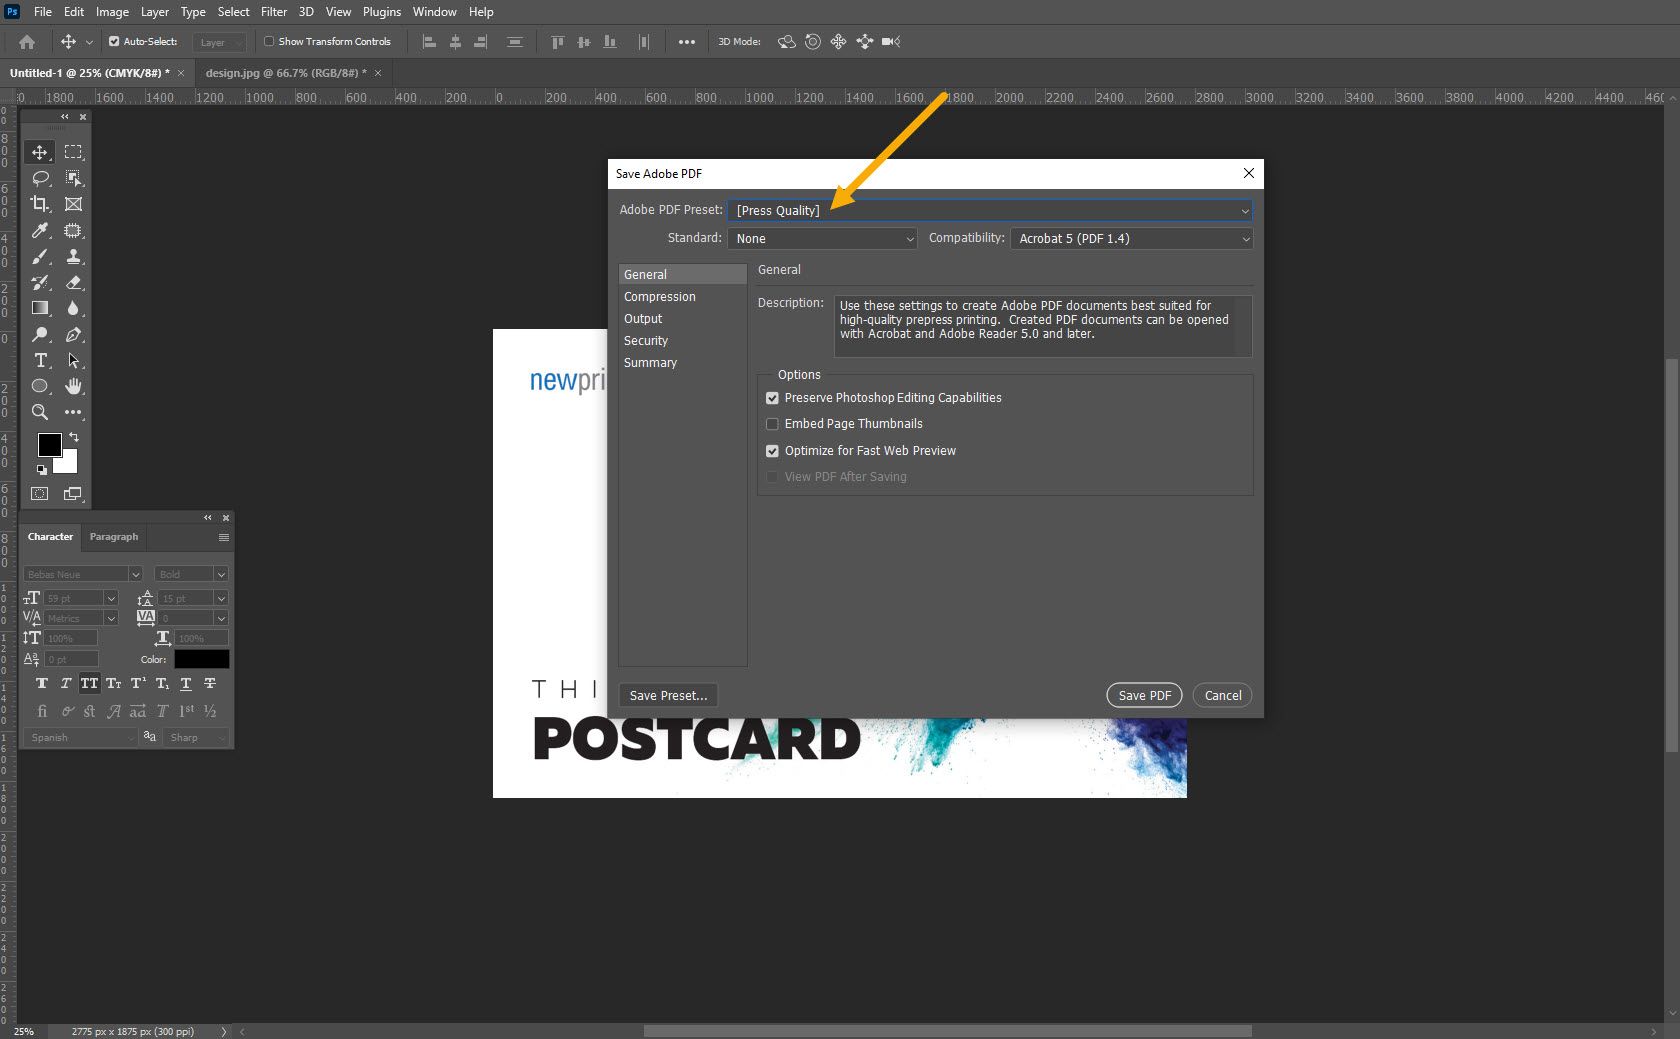
Export the print file in Adobe Photoshop
Photoshop can create very large files, especially if working with many layers. So before you export a print file, it is recommended you flatten your design first. Just make sure you have the native Photoshop file saved as well, in case any further changes are necessary.
Go to File / Save As, and for the file type, choose Photoshop PDF. In the Adobe PDF Preset dropdown menu, choose Press Quality. And that’s it. Click Save PDF.
Following these instructions will ensure your PDF files will print as you intended.
We hope these instructions have been helpful and made your file setup at least a bit less stressful. We have some more tips on how to set up a print file for packaging, in case you need them. Please let us know if there are other design steps you would like our designers to explain in detail.